Monday, 25 February 2013

Project Life...

Hope you all had an awesome weekend, weather is very wet again here - it was lovely lying in bed last night listening to the rain pour down.

I thought I would share with you my pages completed so far for Becky Higgins Project Life. I am loving the concept and the fact that my photos are getting used, life documented and I can just record 'random' stuff that may not mean anything to anyone else, but is important to me. Mine is becoming a bit of a 'journey album' for the year, and I am totally fine with that.

Quickly before I launch into PL - I have just reduced this quilt to half price, my machine needs some repairs so this is a good way to get them done AND someone will get a bargain in the meantime. It is a sutnning quilt and perfect for a girl or boy. It has about 2000 pieces in it (approximately) and is currently being quilted so will be ready for dispatch within a week.

It is King Size and listed at $975. Click here to my Etsy Store.


Onto Project Life....these pages are from the week Wilfred spent with me in January, so happy with these and the times he is with me is definitely easier to put together!

Monday we spent a day out at Southbank with our cousins..awesome day and love the photos!

First up - the APT7 exhibition at the Gallery of Modern Art...


Then we met up with cousins and went to the Dinosaur Exhibit a the Museum...so cool!


We did lots of things later in the week and some of them are captured here..... sleepover with a friend, ear ache, Wilfred working on his own project life and a day at the beach.

I am really getting good (well I think so anyway!) with Photoshop and love being able to add captions and little bits and pieces to photos to tell the story.

Did you have a game like mine in the bottom left hand corner? I found it recently and Wilfred thought it was hilarious!  Movie tickets, catching up with friends and funny things Wilfred said all combine to make this awesome page.


This is one of favourite techniques - big photo cut into small pieces, mosaiced so to speak! Love it!


Recording the smaller details....where we live.... 


Onto week 4....odds and ends fill the pages....a quote I love, a tag from a parcel I received and some photoshop before and after pics!


Week 5....First day of school. I love Subway Art - just saying!


 How cool is my new ironing board cover? Yes, it is the subway art pic..he he. These two pages need a bit of finishing.


This week I have tried something one of the PL Masters use - restricting myself trying to use just a couple of colours in the week. This week bule and green, the photos were taken after the rain so those colours were perfect...love the look and I will be trying this all the time now.


And that is where my printer ran out of ink....so I have come to a screaming halt for now! 

Have a great day.

Kylie xo xo

Friday, 22 February 2013

Things you have to make...

Hi All...I am recovering from surgery at the moment so thought I would share with you some things I have found 'surfing the net' that you may like to try out. I had my gall bladder removed and was recovering well but have picked up a chesty thing which hurts everytime I cough....so my plan to get back to a little hand sewing today has gone out the window.

Some are quick and easy to whip up...others take more time but are still fun!

First up...this recipe for Lemony Lemon Brownies I found last night and want! Doesn't it just look yum? I will be trying this recipe out as soon as I am up to it.

Image Courtesy of Betty Charms & Co

Next....a tutorial from Lori Holt over at Bee in my Bonnet to make a Mini Design Board. I made one as a Christmas gift for a new quilter, unfortunately I didn't see her so I have adopted it and LOVE it (sorry Ann, I will make you another he he). I need to make another couple as I am forever moving one project off it to put a different one on. Lori also has a really cute Row Along going at the moment, and I love reading her blog!

Photo courtesy of Bee in my Bonnet.

Being laid up means I have had time to read a good book again...Emilie Richards is one of my favourite authors who writes some 'quilting related' novels and many others. Wedding Ring is the first I read and probably my favourite - however I also love (and am re-reading) the Happiness Key series.


This site I have discovered recently..lots and lots of FREE patterns! Need to spend a couple of hours looking through them all. The photo is their Cupcakes, IceCream and Birthdays section.


Bonnie Hunter over at Quiltville has lots of free patterns and an awesome blog...it is one of the few I read every day so I don't miss anything.

Image Courtesy of Quiltville.com

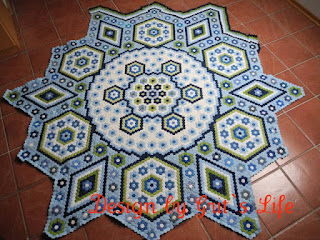
And finally one I just have to show you for a stunning Hexagon Quilt....I have bought some fabric to get started but will be buying the paper hexagon templates for this one as it needs 12 000! The instructions are in parts on her blog, who is up for a challenge?

Image Courtesy of Grit's Life

That should keep you all busy for a while! 

Have a great day.

Kylie xo

Wednesday, 13 February 2013

7 Day Special

Hi All

Special in my Etsy Store - 30% off everything for 7 days only!

You will need to enter the code: FRIENDS on checkout - great time to get a beautiful quilt at a discount price! Lots more being loaded tomorrow.


Have a great day everyone!

Kylie

Tuesday, 12 February 2013

On a Roll...

Very quick post today, I am on a roll working on lots of new listings on Etsy. 

Perhaps the most exciting news (for me anyway) is I will now be stocking Warm and Natural Wadding. I love this product and have used it whenever possible in my quilts. It is warm, durable, easy to work with, doesn't bleed through your fabrics and washes in the machine. Love it!


It is traditionally the most expensive also...however here is your chance to buy it at reduced rates!
Queen Size:  $65
King Size:  $85
By the Metre:  $22.50

If you are in Brisbane and would like to buy it by the roll, I can give you a great price. Email me!

Jump on over to my Etsy store and check out all the new items....wadding, bags, pincushions and quilts. Lots more to come tonight!

Have a great day!

Kylie

Saturday, 9 February 2013

A FREEBIE for you!


Need a super quick gift for your quilting buddies?
How about a Cathedral Windows Pincushion??

This is a quick little project you can whip up in a few hours…makes a fantastic gift for any quilting friends, or anyone that sews. You only need a few scraps of fabric and some stuffing and away you go.


What you need:
First of all - chose some fabric, you only need a little bit so no need to go out shopping, I am sure you can find something at home if you really try?

I suggest you chose a feature fabric first, a print or floral or even a small panel, then just chose two colours that go with it, one for the background and one for the frame.

In this pic the Frog is the feature Fabric, Red is the Frame, Green is the Background and there is a bigger square of the frog fabric on the back.

When choosing the frame fabric, keep in mind only a small amount shows so don't use a big print - homespun or a tone-on-tone works well here . I am using the green for the frame, the paisley is the feature and the back and the red is the background. The white piece shown is pellon - lightweight and iron on! You only need a 3" square of it...and if you don't have iron-on just use non-iron on or thin wadding, whatever you have on hand. 

 The cutting:
·         1 @ 3" square of feature fabric
·         1 @ 3" square of iron on pellon - thin is best  (you can use thin wadding or non-iron on if you don't have any of the iron on pellon)
·         4 @ 3" squares of frame fabric
·         4 @ 3 1/2" squares for the background
·         1 @ 6 1/2" square for the back of the pincushion

My pieces all cut:

Construction:
1.  Iron your frame squares in half diagonally right sides out.
2.  Place a frame square (which is now a triangle) over one corner of a background square lining up the raw edges and tack in place - I do this by hand, it is a nice relaxing job if you have a whole pile of them prepared. You can just sit and stitch over a cup of coffee.

NOTE: Make sure your taking line is NO MORE then 1/4" from the
edges of the fabric, otherwise it will show on your pincushion. 

3.  Repeat for the other 3 frame and background squares and then iron them to ensure they are sitting nice and flat.

4.  Place your squares together to make a bigger square, with the frame fabrics forming a 'square on point' in the middle.

5.  Using your sewing machine and a 1/4" seam, join them together into a square by joining in pairs first and then into one big square. Iron the seams open.


6.  Iron the pellon onto the reverse of your feature fabric square. Do this by placing your pellon onto the ironing board, glue side up (the glue side has the dots), and then placing the feature fabric square onto the pellon, right side up. Iron from the fabric side - otherwise the glue will seep through the pellon and onto your iron...YUKKY!

7.  Place this square over the middle of the big square you prepared earlier, carefully fold the edges of the frame fabric triangle over the feature square and pin in place. I find this best to do with your thumbs holding the feature square in place so it stays centred.
NOTE: Be quite forceful when folding over the edge…the edge of the feature fabric square should also fold a little.
  

8.  Blind hem stitch the frame fabric into place on the feature square. I use hand quilting thread in a colour that matches your frame fabric. Hand quilting thread is stronger than ordinary thread and you can therefore pull it tighter making it more invisible.

The corners should just overlap with one over the top of the other.

9.  Iron the piece, ensuring it is sitting nice and flat.

10.           Place this square right sides together with the 6 1/2" square for the back of your pincushion. Stitch around the outside edges using a 3/8” seam leaving a small gap or turning - about 1 1/2" is usually enough. I like to use a wider seam for this – as it means it is less likely the seams of your pincushion will burst when stuffing or with use.

11.           Turn your pincushion right side out, push out the corners nicely with a point turner tool or similar.

12.           Stuff your pincushion. When stuffing - take your time, use small pieces starting with a really small piece poked into each corner first to make sure they are nicely filled. I stuff with pieces of stuffing about the size of a large marble at a time. It is worth taking the time to stuff it properly so the pincushion is not lumpy.

Did you know if you use Lamb's wool stuffing it keeps your pins from
rusting because of the Lanolin in it?

13.           Hand stitch the opening closed using a blind hem or ladder stitch.

Ta Da....you now have a finished pincushion...... Well done!

I would also like to show you some other projects I have designed using Cathedral Windows (the easy way!) – cushions, table runners and wall hangings. You can also make quilts, and I have plans to make one with Liberty Prints and white frames and background, however they are not as durable as ‘normal piecing’ or appliqué quilts and they are very heavy because of the layers of fabric.

First up – Christmas Tablerunner. One of my favourite patterns ever!

 Cathedral Wallhangings:


Cushions:


There will be lots more freebies, tutorials, hints and tips coming....why not subsbribe so you don't miss anything? Go to the right hand side of this page and 'subscribe by email'!

Hope you enjoyed this tutorial - if you try it out, I would love to see pics!

Bye for Now

Kylie  xoxo


Thursday, 7 February 2013

Incorrigible....

Hope you have all had an awesome day...with a little of something you love in there!

I called in to Spotlight for black wool to keep going on my hexagons (see last nights post here!) - that is all I needed, two balls of black, my plan was to be in and out in under 5 minutes. That is where my plan came apart...empty shelf! Oh darn-it!

Then I hear something from the next shelf calling me...it was COLOUR and it was calling my name...LOOK AT ME, LOOK AT ME, LOOK AT ME!

So I did - that was my first mistake. he he
Isn't it just beautiful, and then the thought comes to mind - SOCKS! I have wanted to learn to knit socks for about 3 years. Basically since I saw Anja's beautiful creations (also in last night's post). I have a couple of pairs she knitted, but I want to make my own. And those colours..oh my...of course two balls came ome with me.

Again, one of my earliest memories is my Nan knitting socks - she knitted all Dad's work socks for years and years and years. Knitting was the second crafty thing I learnt...quilting came much later.
Part of the reason I have never knitted socks is because I can't use double ended or circular needles, I have tried a couple of time and CAN'T. Well pfffttt to that - you can do anything if you try. I so need to remember that before procrastinating for years because I think I can't.

So race home, hot coffee, find the needles (also my Nan's) and try, just perservere and try. Work through the awkward start, not sure where the needles should sit...but keep trying. And suddenly I am off and racing...ohhh so exciting.
I got up late today, so plan on knitting the night away - maybe half a sock if I am lucky. I will worry about them fitting when I get to that point. This pair is all about the learning.

This is the brand of the wool - they have lots of beautiful colours in it, I love variegated thread and wool as it is so exciting to see the colours come together as you work.


Have a nice night everyone!

Kylie xoxo
Wednesday, 6 February 2013

Turning a corner...

Today has been an awesome day! I really feel like I have hit rock bottom, turned a corner and can now move forward. The other thing I have to say is....it does not matter what you are facing, there is help out there if you need it. Just keep looking!

I have also been LOVING this weather...beautiful sunny days to dry everything out, grass that is greener then I have ever seen and cooler nights. I went for a walk around our unit complex tonight taking some pics..and the Mock Orange flowers around the pool are just beautiful and the perfume is to match.


I also love that with the cooler weather imminent, all the beautiful wool starts to come out in the stores, this year I am determined to learn to knit socks. I love the socks a friend knits..check them out here......Socks, scarves and anything. Her latest ones are even 'patchwork socks' made from leftover yarn. 

Crochet was the first 'craft' I ever learnt (think I have already told you this) my Nan taught me in Grade 2 and I remember crocheting a chain that stretched across the classroom. That was the start of my creative life and is still one of my favourite things to do....by now I am hanging out for the long winter nights rugged up with Fluffy and my project! 

Last night the 'call of the wool' just got too much for me, so out came a project I started last year but didn't get far. Look at these colours, what I call bright pastels...do you think I should add orange?


What am I making? Crochet Hexagons, which will eventually become a rug.

Here is one hexagon...which is about 4" across.

Here is my blanket so far...there is a long way to go, the first few are a bit tricky but once you get the hang of them they are easy peasy. The beautiful thing is they are crocheted together as you go, so no sewing up at the end. Unfortunately there are still ends to tie in....looking for a volunteer??

Aren't they beautiful?

I am a bit sorry I didn't use white around the outside, and am still thinking about changing. I will make a few with white and then decide - it would be a quite easy job to unpull the outside round of these and change. 

Here is the project I saw and wanted one....
Photo courtesy of Attic24
I know you all want one too, so Click here for the FREE I used pattern from Attic 24! There is lots of different free paterns out there, the main reason I chose this one is for the join-as-you-go. There is even a flickr group called Hexie Love.

Hope you all had a great day!

Bye for Now

Kylie xo


Friday, 1 February 2013

Best day of the fortnight....

Just a quick post today...need to get some tidying done!

Guess who comes today for the weekend? 3pm every second Friday (during school terms) is my favourite time of the fortnight.

Here is a hint....taken on Tuesday which for him is the first day of Grade 5. What a handsome man is growing into, but I am glad he will still be a little boy for a while yet.

Not sure what we will do this weekend yet - looks like a wet one again. Hoping to get to Movieworld tomorrow but will see what the weather is like.

Wilfred has decided he wants to do his own Project Life album so we will probably do some more work on that - here is the title page he put together....


 And the pages he put together on his day Scuba Diving...


Have a great weekend everyone!

Kylie xo