So, here is what I have been working on today - a LEFTOVERS quilt. I make a lot of QAYG (Quilt As You Go) quilts as I find it easier then quilting a large quilt, once I have made the tops they often sit in my cupboard for a year or so before I get around to the quilting, so QAYG solves the problem.
Hand in hand with this goes leftover bits and pieces, I LOVE repurposing stuff so they all just get thrown in a bucket until I feel like joining them. (Sorry about the picture sideways..only way it will publish!).
In that bucket is bits of borders, spare 'test' blocks, orphan blocks which can be quilted and added and samples made for patterns. All can be finished into blocks and joined in - to me that is the true meaning of 'quilting', throwing in whatever you have to make a quilt.

I also keep all the leftover bits of binding and joining strips from my QAYG quilts (more on that later) and they go in a separate bucket. See that black and white stripe?? Lucky I like it cause I am sure it reproduces when I am not looking. It just never ends! (sideways again..least it is consistent)

When making QAYG quilts I use joining strips in between the blocks. There are lots of ways to make QAYG quilts, however this is the method that works for me. When joining you need strips for the front and the back - I use the following:
1 1/2" strips for the front
2 1/2" strips for the back
3/8" seam
+ Blocks that have been layered with wadding and backing and quilted.
Blocks can either be sewn onto wadding and backing as you make them, or you can make the block and then layer it with wadding and backing and quilt. One block is much easier to handle then a whole quilt.
NOTE: I have done QAYG with narrower strips, using a 1/4" seam, however I found it hard to handle and at times it was hard to catch in the edges of the fabric - the slightly wider seam is much easier to work with, particularly as you join with your walking foot on.
How to join your blocks:
Iron the back strip in half lengthwise, right sides out.


Iron the back strip in half lengthwise, right sides out.

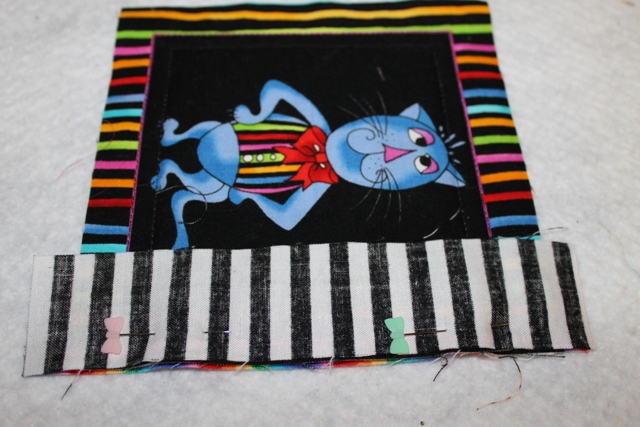
This pic shows the front strip, back strip and first block:

Place the 1 1/2" strip right sides together onto the top of the block with the edge level with the edge of the block. Leave a little tail top and bottom on the strip - you can trim it level with the block later.
Place the folded 2 1/2" strip onto the back of the block with the raw edges level with the edge of the block.HINT: I suggest you pin to start with - I don't but that comes with practice!
Place the folded 2 1/2" strip onto the back of the block with the raw edges level with the edge of the block.HINT: I suggest you pin to start with - I don't but that comes with practice!

The back looks like this:


Iron the FRONT strip only over the seam and the edge of the block.


Place the front strip right sides together with the second block (the one you are joining the initial block to). Stitch using a 3/8" seam.

And the back....

Lay the blocks out flat - if your seam allowance is accurate, the edges of the blocks should butt up together, they should not overlap AND there should be no gap between them.
NOTE: Make sure you get your seam allowance right before you proceed!

Iron the back strip over, covering the join where the edges of the blocks are. The folded edges should cover the stitching line from where the front strip was joined to the second block. Pin in place.

Hand stitch the folded edge of the back strip down using a blind hem stitch - I use Hand Quilting Thread for this as you can pull it nice and tight making the stitches invisible.
Is that clear as mud? If you need help leave me a comment!
Join your blocks into rows...then join the rows using the same method. You can even quilt borders first, then join them onto the quilt using the strips again - much easier!
Here is my leftovers quilt, totally reversible and all from bits that would normally just get thrown, can you pick the joining strips now? The idea with QAYG is to make them a feature!


See that Orange and Navy Blue block?
That is a quilt I started about 1997 and never did anymore with - looks great in this quilt!

This is before today's additions!
I have lots of pics of QAYG quilts...but that will have to wait for another day!
Bye for Now
Kylie xo

Very strange....came rushing over from FB to check it out, and it says you posted it yesterday but it honestly wasn't showing up all morning or last night.....anyhoo......gonna so give this a go, be prepared for "HELP" messages if I get stuck!
ReplyDeleteHugs
Naomi